


Mock-ups are incredibly useful business tools for any designer who wants to see what their end products will look like or to show them to interested parties. Of course, when it comes to T-shirt design, you could do a short run of just one print onto your chosen garment and show that to a prospective client to encourage them to place an order for more. However, this is a time-consuming process which will not necessarily lead to an increase in sales. What’s more, printing just one or two prototype designs is costly because you still have to fork out for all of the set-up costs involved.
The practical alternative is to mock-up your design at DesignBundles. Here, you will find an array of T-shirts of differing designs, colours and sizes – so there is always bound to be the right one to suit your particular design needs. Once you have located the right sort of image for your client – perhaps a boys-sized T-shirt or an adult polo shirt, depending on their preferences – you can then add your design. This will make your mock-up unique and give your prospective customers a much better idea of the sort of thing you are proposing to put together for them.
Although virtual mock-ups, of the sort you can produce quickly and easily at DesignBundles, are great selling tools, they offer so much more. Another key advantage of using this approach is that it will allow you to tweak your design. What you have produced on your computer or by hand may look good on paper or on the screen. However, as soon as it is mocked up on an actual garment, such as a T-shirt, you may want to adjust the design so that it looks better.
For example, some designs you have come up with may look brilliant on round-necked T-shirts but they may not work so well on V-necked ones. If so, you can make the necessary adjustments to your design and reapply it to the mock-up you want to show off to clients. Remember that this approach does not just work well with T-shirts, but it is just as good if you are working on other sorts of apparel. Anything from shirts, hoodies, leggings, swimsuits, baby grows, summer dresses and even face masks can all be mocked-up and adjusted with just the same degree of control.
Read on to find out how to create a truly stunning and very realistic T-shirt mock-up at DesignBundles and how you can then apply your knowledge to many other sorts of garments, as well.
Step One – Come Up With a Winning Design
Just as with any winning design, there has to be a creative part of the process. This is when you will put your mark on your T-shirt design with something that makes it stand out from all the others around. Of course, if you are pushed for time, then you can always use a standard design and apply it to the mock-up templates available at DesignBundles but it will usually be better if you use your own design. This is because you will then have something unique to show off. Either produce your design in some illustration of graphics software or hand draw it and scan or photograph it. DesignBundles can handle designs in virtually any digital file format used for images these days.
Step Two – Head to DesignBundles to Find the Perfect Mock-Up Template
The next step is to visit the DesignBundles website where you will find a myriad of different product types which you can use for mock-ups and virtual prototypes. Since we are interested in T-shirt mock-ups in this guide, you will need to focus on just those. On the left-hand side of the screen, look for templates and then mock-ups. If you click on this then you will only see the mock-up templates on the site. Next, filter your results so you only see garments by clicking on clothing. Alternatively, you can use the search bar to enter ‘T-shirt’ or something similar to produce a set of honed in results.
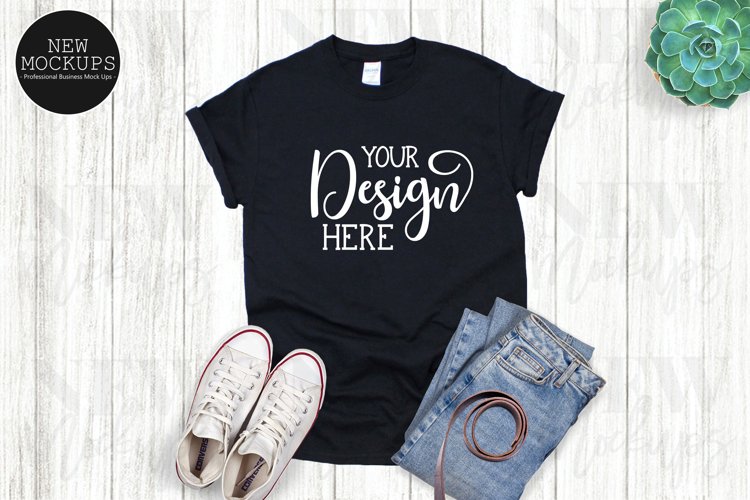
Step Three – Add Your Design to the Mock-Up
Once you have found a mock-up template that will suit your purposes, it is time to insert your design. You will see ‘Mock-Up, Your Design Here’ on all of the templates. When you have purchased one from your cart, you will be able to download it and use it without any writing on it. This means you can immediately insert your digitized design by laying it straight over the top. If you are happy with the results, then there is nothing else to do!
Step Four – Adjust Your Design as You See Fit
Some designers will want to alter their design once they see the mock-up and the initial design brought together. Sometimes, this will be repositioning the design or deciding to use another mock-up template from the first one that was tried out. Maybe you will want to change the color or the size of your design to match the T-shirt better? Whatever it may be, this is all entirely possible and easy to do.
Step Five – Make Use of DesignBundles’ Add Ons
With the design in place, you now have a successful mock-up. However, you can make it look even better with DesignBundles’ array of add ons. Take a look at them. Typically, these make the design and the template look more refined together, such as using Lightroom presets which makes the light look natural, or InDesign, a software system that standardises designs at a stroke.
Step Six – Try Your Design With Other Clothing
Once you have perfected your T-shirt design mock-up, why not see how it looks on other clothes? This is great for corporate clothing designs, for example. Sometimes, T-shirt designs can also look great on vests, hooded tops, sweatshirts and camisole tops, to name but a few. Using your design in a new context is easy and it will mean being able to show your clients all of the possibilities open to them.
End Of Article